
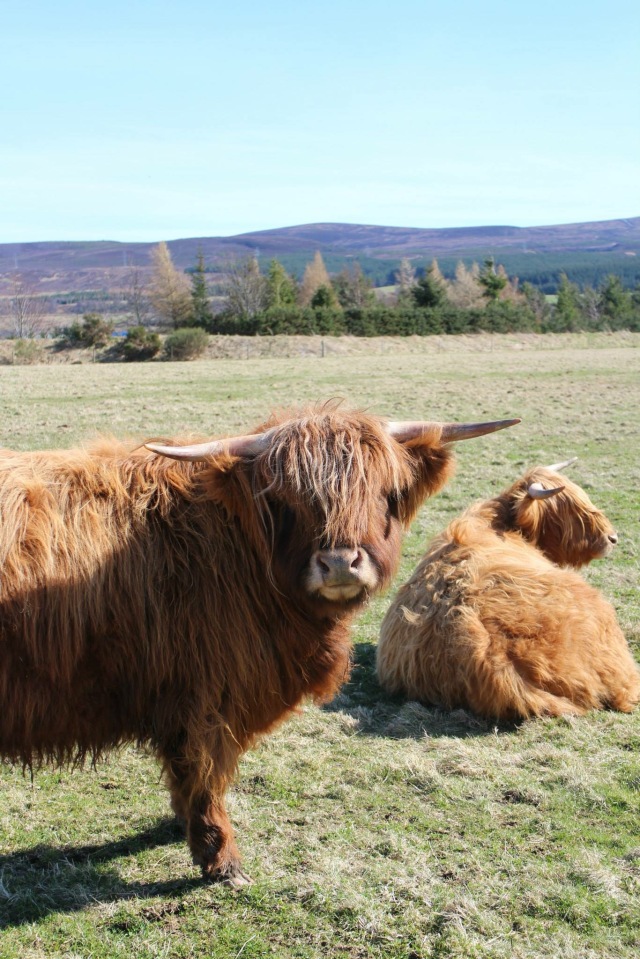
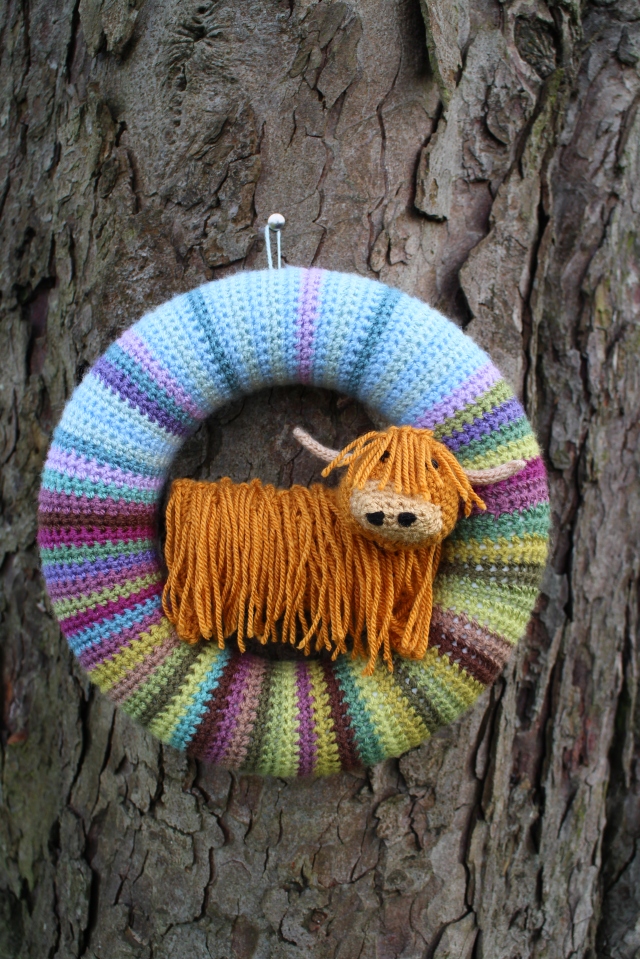
You might know this handsome creature as a Highland Cow but in my family they have always been woolly bullys ever since my mother declared them to be so when she was just a young girl on her first trip to Scotland.
I took this photograph of a woolly bully in the field adjacent to the car park of the Culloden Battlefield Visitor Centre in the Highlands of Scotland two years ago when I took my Mum on a Highland Road Trip to celebrate her 6oth birthday.
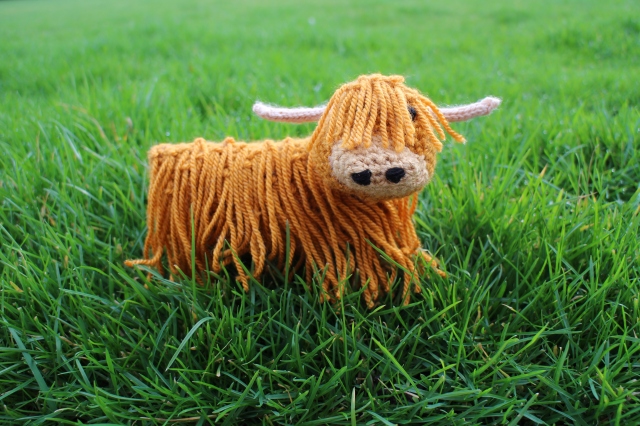
I was sat looking at my Moorland Wreath, made with the colours of the Yorkshire Moors as put together by Lucy at Attic24 and realised that these were also the colours of the Highlands and that a woolly bully sat inside had the potential to be even more wonderful than the Swaledale Sheep I put in the Yorkshire version. I set about designing the woolly bully and am happy to share the pattern here with you.
This is what my finished woolly bully looks like. She is roughly 13cm long (plus an extra 3cm or so where her horn sticks out) and 11cm tall which enables her to sit snugly within a 23cm wreath but gauge isn’t hugely important when making a decorative item of this nature and I am sure that small size variations will have very little impact on her fabulousness!
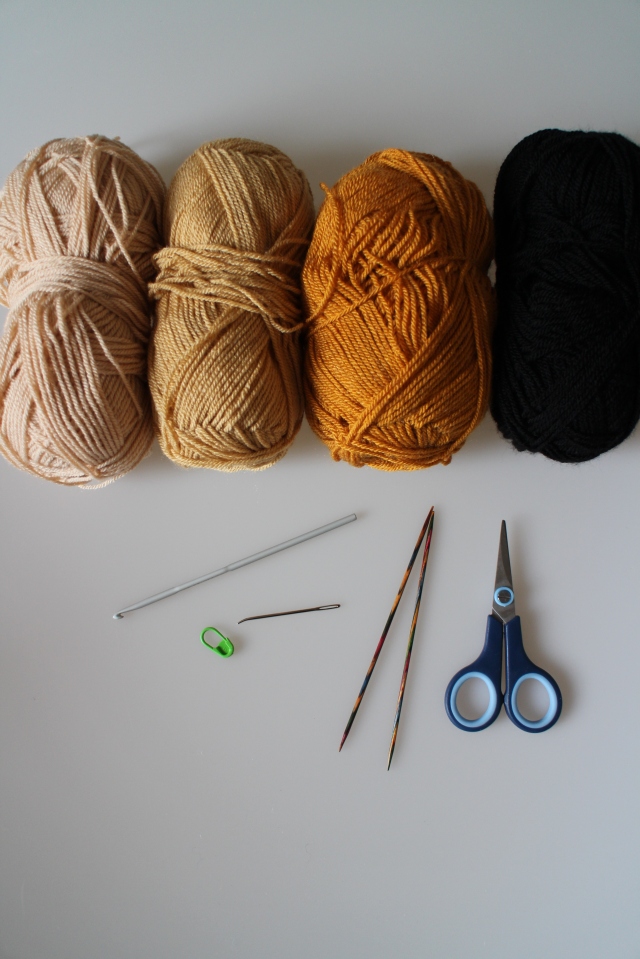
To make my woolly bully I used three shades of DK weight yarn plus black for the embroidered details. I used Stylecraft Special DK as it is affordable, comes in a huge range of colours and doesn’t squeak like some acrylic yarn does. I used Gold for her main body, Camel for her nose and Stone for her horns. I didn’t calculate yardage but it is small. Really small. If you could use stash yarn for this project that would be perfect, if you buy especially to make this expect to have the majority of the ball left over.
I also used
- A 4mm crochet hook
- Double Pointed Needles – mine are 2.5mm but size isn’t vitally important here I think anywhere between a 2mm and 3.5mm would work well.
- A needle to sew it together
- Scissors
- A stitch marker – this isn’t an essential item but the head is made in a continuous spiral and without a marker to show you the beginning of the round there will be a lot of precise counting. You could also use a piece of scrap yarn in a contrasting colour.
- Something to stuff your cow with. You could use toy stuffing, bits of an old pillow, ugly yarn, whatever you have to hand. Mine used around a hand full.
These are the stitches you will need
- chain (ch)
- single crochet (sc) known as double crochet in UK terms. Hook through stitch, yarn over, pull through stitch (2 loops on hook), yarn over, pull through both loops
- 2sc – make 2 single crochet into the same stitch
- invisible single crochet two together (invsc2tog). Insert hook in to front loop only of first stitch, insert into front loop only of next stitch (3 loops on hook), yarn over, pull through first 2 loops (2 loops on hook), yarn over, pull through both loops
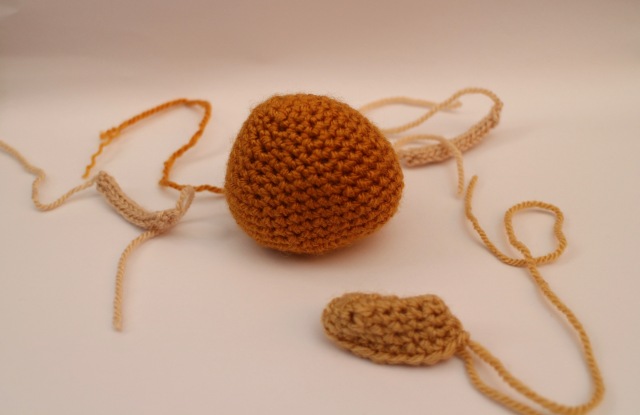
The pattern is made of 4 distinct parts. The body, head, nose and horns.
The Body
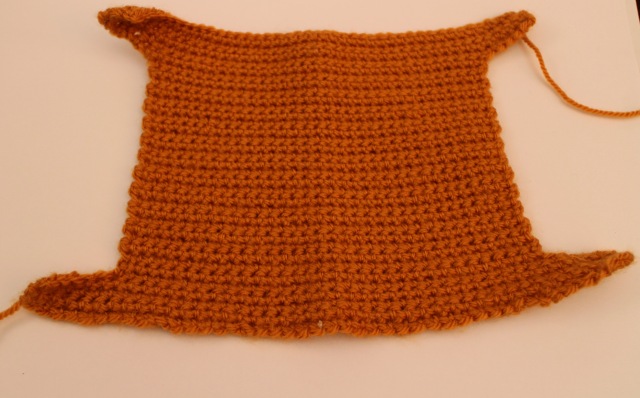
The pattern for the body is very heavily influenced by Attic24‘s sheep pattern. It isn’t the same but the concept for this flat shape turning into a 3D body is most definitely borrowed and so rather than replicate Lucy’s work of step by step photos if you find yourself in need of clarification it would be well worth a trip over to her pattern here.
So to begin, using your main colour yarn, chain 46
Row 1. Starting in the second chain from the hook make one single crochet in each stitch. Chain 1. Turn. (45 stitches)
Rows 2. – 5. Single crochet in each stitch across. Chain 1. Turn (45 stitches)
Row 6. Single crochet in the first 40 stitches leaving the last 5 unworked. Chain 1. Turn (40 stitches)
Row 7. Single crochet in the next 35 stitches leaving the last 5 unworked. Chain 1. Turn (35 stitches)
Rows 8. – 30. Single crochet in each stitch. Chain 1. Turn (35 stitches)
Row 31. Single crochet in each stitch across. Chain 6
Row 32. Starting in the second chain from the hook make 1 single crochet in each of the 5 chains and then single crochet in each stitch across. Chain 6
Row 33. Starting in the second chain from the hook make 1 single crochet in each of the 5 chains and then single crochet in each stitch across. Chain 1. Turn.
Rows 34. – 36. Single crochet in each stitch across. Chain 1. Turn. (45 stitches)
Row 37. Single crochet in each stitch across. Fasten off leaving a long tail for sewing up (45 stitches)
You should have this shape. The large bit in the middle will be the body and the little sticking out bits will be the legs. At this point you don’t have a right side and a wrong side but you will once you start sewing the legs so lay it down flat and the side facing you will be the wrong side.
Start on the leg with your most recent yarn tail and fold it up so that the two long edges come together. Sew these two edges together securely. Then repeat for the other three legs making sure that you are folding them each the same way so that once they are done you will have 4 seams facing you with the body laid flat.

Fold the body in half, along the blue dashed line on the photo with the right sides together. That is with your leg seams facing outwards. Then sew the short edges together, the ones marked by the solid green lines on my photograph.
It should now be starting to look a lot like a cow with a body and 4 legs. Turn it inside out so that the sewing you’ve just done is not visible and lightly stuff. Then it will just need one more row of stitches as you sew up along what is now the belly. It is probably worth putting a couple of stitches in between the legs just to strengthen then close up the gap sealing the stuffing inside. It won’t be especially stable but your cow body should stand up on her legs if you arrange them to distribute the weight.
The Head
The head of the cow is made amigurumi style, that is in one continuous spiral. I put a stitch marker in the first stitch of a round to show me when I have completed the circle without having to rely on keeping count. It is made using the same colour yarn as the body.
In this section wherever there are instructions *enclosed by asterisks* repeat those stitches until you reach the end of the round.
Start by making 6 single crochet (sc) in a magic loop. (I like this tutorial if this is new to you)
Round 1. Make 2 single crochet into each stitch (12 stitches)
Round 2. Single crochet in each stitch (12 stitches)
Round 3. *Single crochet into the first stitch, 2 single crochet into the next stitch* (18 stitches)
Round 4. Single crochet in each stitch (18 stitches)
Round 5. *sc, sc, 2sc* (24 stitches)
Round 6. Single crochet in each stitch (24 stitches)
Round 7. *sc, sc, sc, 2sc* (30 stitches)
Round 8. Single crochet in each stitch (30 stitches)
Round 9. *sc, sc, sc, sc, 2sc* (36 stitches)
Rounds 10. – 14. Single crochet in each stitch (36 stitches)
Round 15. *sc, sc, sc, sc, invsc2tog* (30 stitches)
Round 16. *sc, sc, sc, invsc2tog* (24 stitches)
Round 17. *sc, sc, invsc2tog* (18 stitches)
Round 18. *sc, invsc2tog* (12 stitches)
This is the point to put the stuffing in the head before you totally close up the hole. Loosely stuff. You are aiming for a squashy ovoid rather than a sphere so make sure not to fill it too full.
Round 19. invsc2tog all the way round (6 stitches)
Now break off your yarn leaving a long tail and thread onto a needle. Use this to weave in and out of the 6 reminding stitches and then pull tight to drawstring the hole closed. If it’s not as tidy as you would like make another stitch or so and then push the needle in through the base of the head where you have just finished off and out roughly in the middle of the back of the head. This will help you to sew the head on to the body later but for now set it to one side as we move on to the nose.
The Nose
The nose for our cow is made from yarn in a shade lighter than the head to provide some contrast. Like the head the nose is worked in a continuous spiral so you may find marking the first stitch of each round to be useful.
To begin chain 7
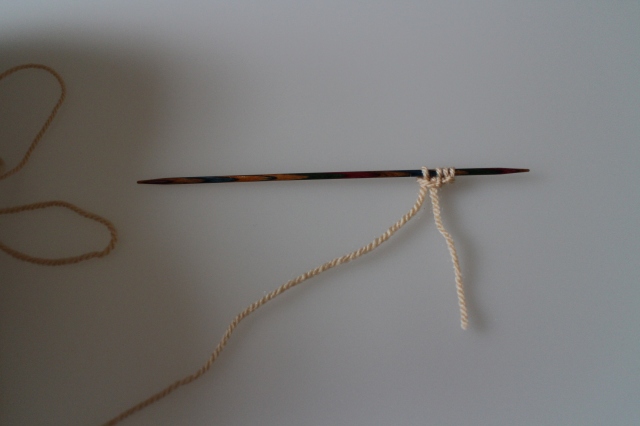
Round 1. Starting in the second chain from the hook single crochet in each of the next 6 chains. This will bring you to the end with 6 stitches but rather than turning here the next 6 stitches will be worked in the single loops left on the other side of the starting chain, the first of which is shown here by my needle. Single crochet in each of these loops. (12 stitches)

Round 2. Single crochet in each stitch around (12 stitches)
Round 3. *single crochet, 2 single crochet in next stitch* Repeat this pattern to the end of the round (18 stitches)
Round 4. Single crochet in each stitch (18 stitches)
Slip stitch into the first stitch of the round to finish and then fasten off leaving a tail for sewing. This should leave a kind of square edged hat shape. Put it to one side.
The Horns
The horns are knitted as I find working tubes of crochet this small to be headache inducingly fiddly but they are very simple to make. This technique is known as I-cord and apparently the I stands for idiot because it is an idiot proof technique! You will need to make two of these and I made them in a lighter shade than the nose for added contrast but they would certainly work in the nose colour.
On your double pointed needle (dpn) cast on 4 stitches. Then knit these 4 stitches to the other needle. This is where things change from usual knitting. Do not turn your needle! You will have 4 stitches on your needle with the working yarn at the left hand side. Slide these stitches down towards the point on the right end of your needle
Now knit these stitches from right to left as normal pulling the working yarn behind your work to get it to the righthand side to use it. Your stitches will then be on your second needle, slide them down to the right and bringing the working yarn from the left behind the work to use knit again. Keep knitting these 4 stitches until you have an i-cord measuring 4cm long. Then cast off and make another one. If I haven’t explained this clearly enough then youtube has lots of good tutorials if you search “knit an i-cord”
These little tubes should have enough rigidity to stick out from the head and curve upwards and stay where you arrange them to be. Your cast off end should be the pointier of the two so thread the end of your yarn onto a needle and push it down inside the tube to weave in the end. If it is long enough to bring out of the side of the i-cord then cut it close to your knitting and the end should spring inside and be hidden. You can use your tail end from cast on to sew the horn to the head.
You should now have all your pieces and its time to sew together. Beginning with a little bit of stuffing inside the nose sew it onto the front of the head. Use my pictures as reference for where to put it. Then sew the horns onto the side of the head and using black yarn embroider on eyes and nostrils. Then sew the head onto one end of the body, facing forwards as shown in the photos and you are ready to add the distinctive hair!
I have added hair in one row across the forehead of my cow to form her fringe and fairly randomly over her body. The first step in adding the hair is to cut some lengths of yarn. For the body you want the yarn lengths to be roughly twice the length you want the hairs to be. For the fringe this length may be a bit fiddly and so a little longer might be necessary.
Once you have some lengths of yarn ready insert your crochet hook through a stitch in the cow and fold your yarn in half to form a loop. Grab this loop with the hook and pull it through the stitch. Then pass the yarn ends through the loop and pull tight to securely knot the hair in place.


She does not need fully covering in hair. Rather than knotting them all on in a straight line it looks more natural if you skip a few stitches, perhaps hop down a row or two. This delightful photo that makes it look a lot like my woolly bully is on a trampoline shows how I have spaced her hair, just keep going until she has a good covering and no bald spots. She will, of course, also need hair on the back of her body.
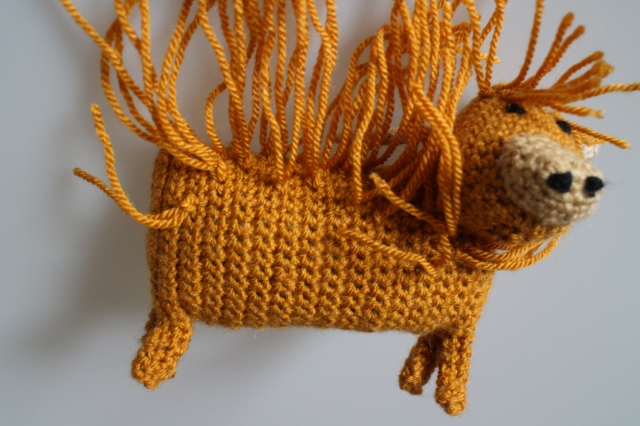
Then she will probably need a hair cut if some of these hairs are a bit long or straggling. My first attempt at trimming her fringe went about as well as every attempt I’ve ever made at cutting the hair of my children! I get the best results by not snipping across in a straight line but by trimming hairs at an angle, just a few at a time. But you may be more talented than I in this area!
Once you have tidied her hair then she should be looking pretty smart and mine was ready to sit inside a wreath.
I only make creatures as decorative items to brighten my home. If you wanted to make this woolly bully as a toy for a child then you will need to take full responsibility for the safety of your creation as this pattern was not designed to be played with.
I will be happy to answer any questions about the pattern.
You are welcome to use this pattern to make items for your personal use but please do not reproduce it anywhere or claim it as your design. This applies to my photographs as well as the written pattern.
Copyright ©2017 I Am Branching Out.

So so so cute! I love the way that you posed him to look like the real Woolly Bully in the picture! Good job!
LikeLiked by 1 person
Utterly gorgeouse, and henceforward to be called wooly bullies by me!
LikeLiked by 1 person
That is so super cute!! Him and your little sheep make an adorable pair ❤
LikeLiked by 1 person
The thought of a woolly bully on a trampoline has made my day!! Thank you for the giggle and for sharing the pattern too 🙂
LikeLiked by 1 person
He’s gorgeous – thanks for sharing the pattern!
LikeLiked by 1 person
Pingback: Swaledale Sheep Pattern – I Am Branching Out
Awesome job!
LikeLiked by 1 person
love your pattern. do you know how you would make it bigger. quite new to crochet and would appreciate some advice
thank you
susan
LikeLike
Thank you Susan.
The easiest way to adjust the size would be to use a thicker yarn and a bigger hook, that way you could stick to my stitch counts but the finished object would have sized up.
To stick with DK weight yarn, the body is simple to adjust. When you make your starting chain, fold it in half and the resultant length is the height of your finished body. You can then add or subtract stitches as you wish to get a size you like (remembering that you might want to make your legs a bit longer or wider too so they stay in proportion). Once you have a height you like just keep adding rows (after the legs) until the body is the length you want before adding the second pair of legs.
Unfortunately there is no such quick fix for the head. Depending on your confidence levels you could just have a play with your increase rounds until you get a size you like and this is what I would be tempted to do.
Good luck with it! x
LikeLike
Thank you so much for your help. I will do that Susan x
Sent from my iPhone
>
LikeLike
Oh I love Heeland Coos!
LikeLiked by 1 person
Pingback: 2017 – My Year in Yarn – I Am Branching Out
Thanks for the pattern. He’s a real winner. I’ve just made him and the wreath as a housewarming present for a friend north of the border. I’m going to make your Swaledale sheep as a friend for him!
LikeLiked by 1 person
Thank you so much for your comment. I love to hear that people are using my patterns. I hope your wreath is well received, I’m sure it will brighten any home xxx
LikeLike
My friend loved him and he’ll be much loved in his new home along with his sheep friend. Just wish I could send you a photo of the two of them together! Thanks once again! Xxx
LikeLiked by 1 person
Hi Please can you tell me how you attached the wooly cow to the wreath, I have almost finished him but not sure how to do that so he won’t come off,
LikeLike
I have mine secured with just a pin in each foot but if you wanted it to be really secure then a few stitches attaching the feet to the wreath cover should hold it in place. I’ve found that once the wreath is in place on a wall the cow rests quite nicely without moving around.
LikeLike
I’m on my 4th coo! I love this design. Wish I could post a photo!
LikeLiked by 1 person
I’m on my 4th coo! I love this design. Wish I could post a photo! I’ve added udders and ears!
LikeLiked by 1 person
That is absolutely wonderful to hear! Thank you so much for letting me know. I love that you have evolved it too, it sounds amazing x
LikeLike